Eye Makeup Tutorial: Pixiwoos Inspired Graphic Eye Makeup
Hello Dolls,
Today I am going to unveil my creative side.. well I have just started venturing out in here so definitely needs a tonn of improvement but I must tell you that I enjoy creating such unconventional designs on lids because it makes me feel artistic :D.
This look is inspired from Samantha from @Pixiwoos fame. She re-created the makeup legent Val Garland eye look with such an ease and it required just 4 things black liner, shadow, white pencil, a tape and yes some skills too :P. I had to try my hands at it and see it I can do it.. because I like to challenge myself which in turn helps me improving my skills.
So here you go.. You can very well go ahead and watch the full tutorial by Samantha but if you want to save time, take a look at the pictorial and descriptive steps and enjoy!!
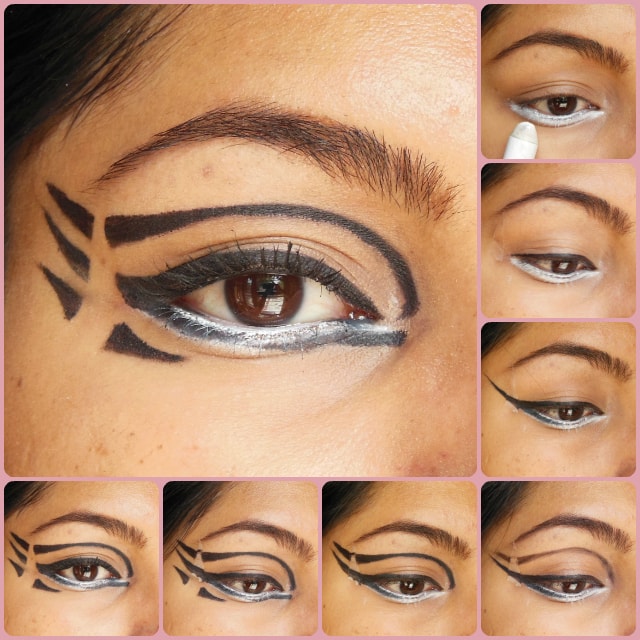
Steps to Achieve the Look:
- Line lower lashline with a white liner/pencil. I suggest to sharpen the pencil before application for a precise and cleaner application… because I made this mistake of using a blunt pencil and hence the end result isnt as clean as I expected.
- Using your favorite gel liner line upper lash line and make sure you leave no spaces between lashes and the lid area
- Take a cello tape and cut a big Triangle out of it and place the pointed side of it towards the brows… take the size cue form pictures. Also, stick the tape at the back of your hand a few times to reduce its stickiness, so its easy to remove from gentle eye area.
- Extend the liner with a sharp wing to slightly above your brows. Color the tape in your way so that you get a sharp wing without any breaks. Also bring the liner to lower lash line covering outer 1/3 rd of the lash line
- Time to define the crease, pick a small detailer brush or an angled brush and outline the crease line with a black eye shadow and extend it again to a wing in similar fashion but a bit longer that the previous one. Its best to keep the color slightly above your natural crease area so that you can fake bigger eyes. Also, do it in small strokes so that there are less chances of mistakes
- Fill in the outlined crease with the same black gel liner using any of the fine liner or angled liner brush.
- Create the 3rd wing starting from inner corners but breaking it right in the middle of the eye and then drawing again from outer 1/3rd of lower lash liner and keeping slightly shorter than the middle wing.
- Curl your lashes and coat them with volumising mascara, remove the tape and enjoy the Graphic eyes!! 😀
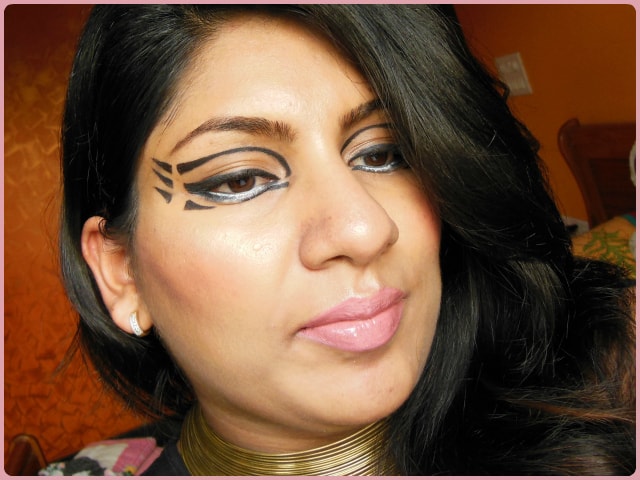
I know it is not something that we can carry off in our day to day life but sometimes its good to it out of the box!! ( and grab all the eye balls ;))
Hope you enjoyed this Pixiwoos Inspired Graphic Eye Makeup tutorial!!
Share your thoughts and feedback in comments below
Loads of love.. :-* :-*
PS: If you get inspired and recreate the look, don’t forget to share it. Tag me on instagram, facebook, twitter (@Poonam_BMM). I would love to see it on your eyes.
View Comments (7)
wow cello tape can be used so well ..... I didn't know that !!!
#instafam
wow!! another lovely tutorial.. best use of cello tape, You nailed d look <3 #PoonamBMM_TBSGiveway
Awesome,.. You are creative, no doubt,.. just to create a winged eye liner I take hours together :) and you easily created such a creative eye makeup look, hats off,... #PoonamBMM_TBSGiveway #instafam
Very creative eyeliner but I think I do not have the guts to carry it in public. :p
Weird but creative look..Please do a post showing all eye looks created..As you have a great variety... :) :)
#PoonamBMM_TBSGiveway #instafam
loved it :) Fierce :)
Love this look! :)